Accounting Chart
The chart of accounts are listed as:
Balance Sheet = assets, liabilities and owners equity
Income statement = revenue, cost of goods sold, wage and administrative expenses.
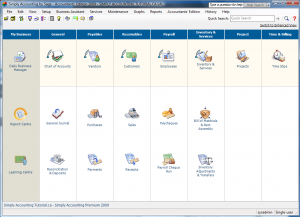
In this tutorial we are going to use Simply Accounting software program version 2009, and will learn how to create a chart of accounts from scratch. Open your Simply Accounting software to home screen. Home screen is shown below.
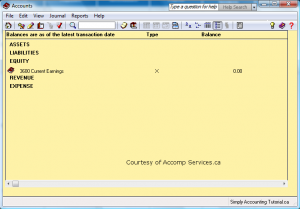
Next, click on Chart of Accounts. Your screen should look like this:
You should see a yellow screen with heading. This screen will fill up as you creat accounts in different categories.
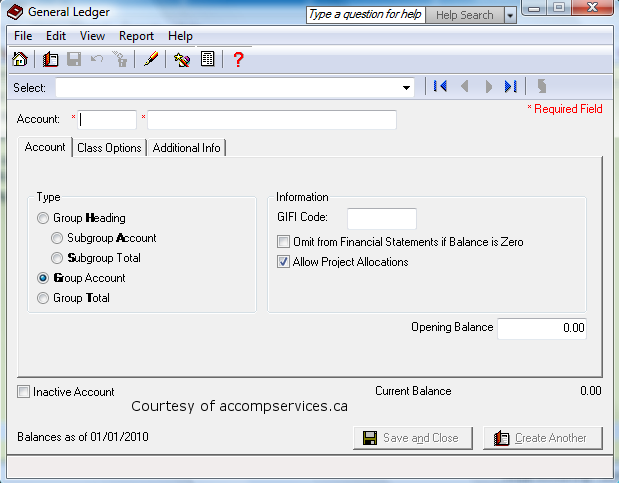
So, lets begin. click on file – create. your screen should look like this:
The chart of account represents the following categories.
1000 to 1999 is set for current and long term assets
2000 to 2999 is set for current and long term liabilities
3000 to 3999 is set for owners contribution, current and retained earnings
4000 to 4999 is set for Revenue
5000 to 5999 is set for cost of goods sold, wages, and administrative expenses.
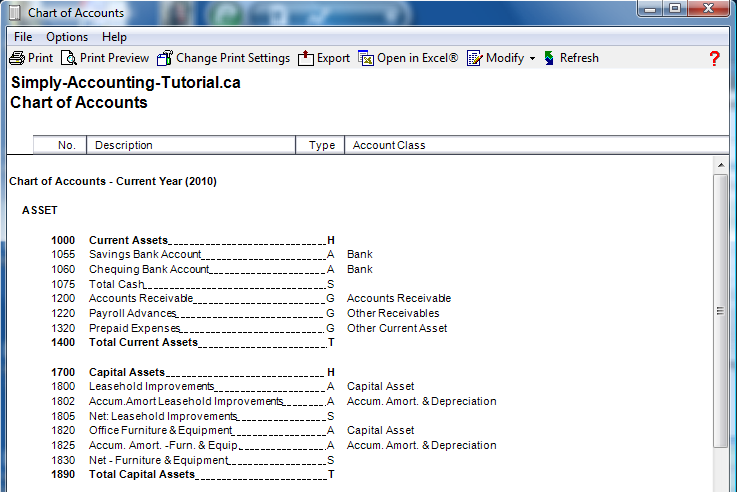
lets creat a few accounts. From the top choose the account number, I have 1055 and my description for that account is Savings Bank Account.
The type is a subgroup account and on the chart of account report it is represented with a letter “G”
Under information GIFI stands for General Index Of Financial Information created by the Canada Revenue Agency in 1999, the GIFI is a system which assigns a unique code to a list of items commonly found on income statements, balance sheets, and statements of retained earnings.
The purpose of the GIFI is to allow the CRA to collect and process financial information more efficiently; for instance, the GIFI lets the CRA validate tax information electronically rather than manually.
For the purpose of setting up the chart of account I will allow Simply Accounting to designate the GIFI Codes.
Click in the box and you can choose to omit this account from financial statements if the balance is zero.
Click in the box if you are using project allocation.
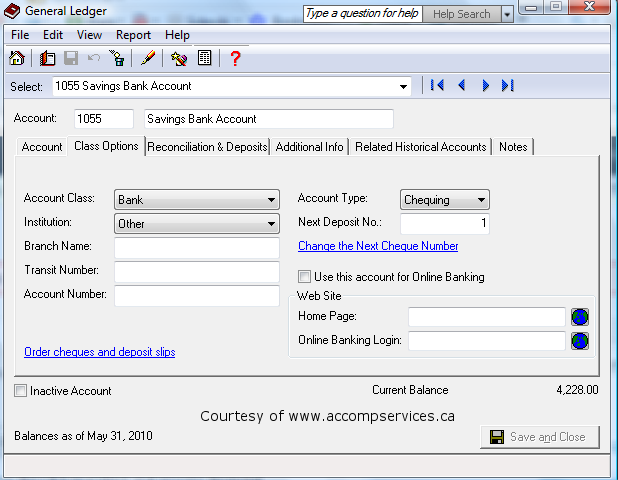
Click on the next tab “Class Options“, your screen should look like this:
It is important to give your accounts a Class Option. The class option for this account is Bank. If you drop down the menu you will see a list to choose from.
Now that you know how to create your chart of accounts, I have a sample one for you to look at and you can adopt the accounts for your business and add more if needed.
Here is a sample of a chart of accounts. Click on the image for a full view.
I hope this tutorial has helped. Drop me a note at http://www.accompservices.ca/blog for any questions.
I have simply accounting software 2010 and i want to create ledger account as i want but in a home screen i did not see any button to like chart of account.I can only know Account information button in tools for my accountant where i know edit ledger account but i don’t know that how to create new ledger account for general entry. Can you help me.
If you mean how to create a ledger account:
On your home screen (Classic View), click on chart of accounts which will take you to accounts showing from 1000 to 5000 series.
I should note that if you are in Enhanced View, at the left column click on Company. At the right hand side, you would see “Chart of Accounts” icon.
Good luck,
SAT Press
I am trying to add a new loan to my account list but can not remember how to add the current balance. I have the account number and everything else I need to do. It won’t let me type anything in that area.
Thanx
Debbie
When simply accounting is set up and no longer in history mode the only way to enter amount for the loan is to do a journal entry.
Credit the loan account and debit the asset account.
I just got Simply acct first step 2012 I am looking for Chart of Accounts and can not find it. Could you plse direct me in the right direction? Thanks
Hi G. Shelley
Chart of account is either created by yourself or Simply accounting will creart it for you.
to check to see if you have a chart of account click on Reports – Lists – Chart of account.
It will be there if one is created.
good luck
How do I rename a account in my chart of account in simply accounting 2003 release D. Can the account be renamed if it has a value in the account
Hi Duane
In 2003 version of simply accounting you can not rename an account name in the chart of account.
In the newer versions you can and you can even change the number.
nk
I have bought 2010 version of simply accounting. I had 8.5 version of simply accounting. We do a cash basis accounting.I have been working with a general journal in the past but I can’t see a window for General. Can I still use it with 2010? If so how
Della
Hi Dela
Congrats, you got Simply accounting 2010 and you want to do cash accounting. When you first install Simply Accounting program the default home screen is set on enhanced mode. On the top right hand side of the screen click on “switch to classic mode”. Once you have done that you can see the general ledger icon on the home screen.
Hope this helps.
Nk
You explained it exceptionally well!
I am trying to adjust my current chart of accounts to align with some national reporting that is required. I have a group heading of Operating Expenses and a sub account of Insurance. I would like to further breakdown my insurance account to detail liability insurance, property insurance, life insurance, etc. Can this be done? Essentially I am trying to create a sub account of a sub account…
Hi Lori
Your trying to build sub-accounts for your chart of accounts.
Yes, this can be done. On home screen click on chart of account and file-creat.
Type in the appropriate account number and for “Type” choose Subgroup Acccount.
Ex:
Account # 5100 Liability Insurance – (subgroup account)
Account # 5110 Property Insurance – (subgroup account)
Account # 5120 Life Insurance – (subgroup account)
Account # 5130 Total Insurance – (subgroup total)
Account 5130 will total the above three accounts and show the total on financial statement.
Nk
Can we breake Account # 5120 Life Insurance. For example
Account # 5000 Insurance
Account # 5100 Liability Insurance
Account # 5110 Property Insurance
Account # 5120 Life Insurance
Account # 5121 Life Insurance Monitoring Center
Account # 5122 Life Insurance Security Department
Account # 5125 Total Life Insurance
Account # 5130 Total Insurance
I’m not sure what you mean by breake account 5120. If you mean breake in to sub-group accounts, you can do that by setting up each account in the chart of account with a Subgroup Account and end with Subgroup Total.
Nk
Can we breake Account # 5120 Life Insurance. For example
Account # 5000 Insurance
Account # 5100 Liability Insurance
Account # 5110 Property Insurance
Account # 5120 Life Insurance
Account # 5121 Life Insurance Monitoring Center
Account # 5122 Life Insurance Security Department
Account # 5125 Total Life Insurance
Account # 5130 Total Insurance
Hi Elena
I’m not sure what you mean by breake account 5120. If you mean breake in to sub-group accounts, you can do that by setting up each account in the chart of account with a Subgroup Account and end with Subgroup Total.
Nk
Have Simply Acct 2011 and when I export Gifi I keep getting message that Totals are not equal to Revenue, Expenses or Liabilities.
Found out via the Sage site, someone has a similar problem.
I have no problems producing financials.
Make sure the gifi codes are not being repeated. I called CRA when I had trouble with mine. Call them or your accountant if
F you still ave issues.
I am doing a school project using a specific chart of accounts. I need to re-number my current earnings and change the “type” from an “X” to a group account. Any ideas?
Hi Mary
You have a school project and you need to change current earnings type status.
I am pretty sure that can not be changed.
That is the only account that is built into the program and its given a type X.
What you can do if you like, create a new account and call it Retained Earnings 2 (or something like that) and give it type Group account.
but in the linked accounts under Setup – Settings – General make sure you change the Retained earrings account to your account.
Good luck
nk